
Getting Started
Afford runs on iPhone, iPad and Mac, and everything below works the same on all three. Here’s the path from a fresh install to a working plan.
1. Take the tour (or skip it)
The very first time you open Afford, it starts in a demo budget — sample envelopes, accounts and transactions — with a short tour card at the bottom of the screen. Tap Take the tour and it walks through each section in about a minute: allocating, envelopes, Spend, Activity, Accounts, Reports and Penny. Or tap Skip to go straight to your own plan.
Nothing in the demo is saved, and it never touches your own plan, iCloud or your bank. It starts fresh every time it opens. When you’re done, tap Set up my budget (or Set up mine on the demo bar). You can take the tour again, or reopen the demo to poke around, any time from Settings → Tour & demo.
2. Pick your start day
Setting up your own plan begins by asking when it starts — Today, the start of this month, next month, one of the last few months, or Choose a day… for any date. This matters more than it looks: each account’s balance at the end of the day before your start day becomes its starting balance, and the cash across your on-budget accounts is what you can allocate from then on. Earlier transactions still appear in Activity for reports, but they don’t count against envelopes.
Don’t overthink it — Today is a fine answer, and you can change the start day later in Settings → Start month, currency & groups.
3. Choose your envelopes
On the same screen, pick Standard envelopes — Essentials, Lifestyle and Savings groups with seven everyday envelopes (Groceries, Rent, Utilities, Dining Out, Subscriptions, Emergency Fund, Vacation) — or Start empty and build your own. The standard set is names only: the amounts, bills and goals are yours to set. If you’re not sure, take it; renaming or deleting an envelope takes two taps.
An envelope is just a named amount of money with a job: Groceries, Rent, Dining Out, Vacation. You’ll add more as real life suggests them — New Envelope is in the ⋯ menu on the Plan tab. See Envelopes & Goals for the different kinds.
The free version of Afford holds up to 10 envelopes (the payment envelopes Afford makes for credit cards don’t count); Afford Pro removes the limit.
4. Add your accounts
Accounts are where money physically lives — checking, savings, credit cards. Two ways to add them, both from the Accounts tab:
- Connect your bank with SimpleFIN (an Afford Pro feature), and accounts and transactions flow in automatically.
- Add account manually, entering the current balance. Fully manual is a first-class way to run Afford — see step 6. You can connect the bank later and merge.
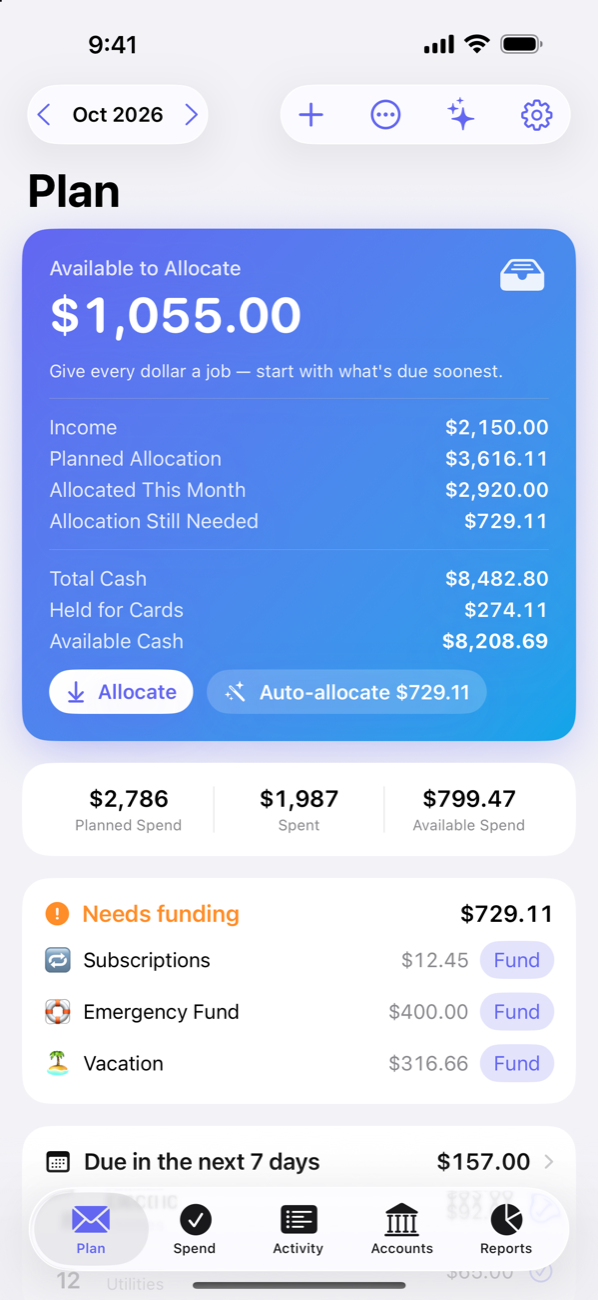
Either way, the money in your on-budget accounts becomes Available to Allocate — a pile of dollars waiting for jobs. Add a credit card and Afford gives it a payment envelope automatically; see Credit Cards.
5. Allocate
Now the fun part. On the Plan tab, tap Allocate on the Available to Allocate card and point money at envelopes: what rent needs, a month of groceries, something toward the trip. Or set a planned allocation on each envelope (how much it should get per month) and let Auto-allocate fund everything your plan still needs in one tap. More in Allocating Money.
Two honest tips for the first pass:
- Fund what’s due soonest first. Rent before concert tickets — not because fun is bad, but because the plan should never wobble.
- Give your wants a real envelope. If concerts matter to you, make a Concerts envelope and fund it on purpose. That’s the whole point of the app.
With Afford Pro and some transaction history in, you can also pick Starter budget from transactions in the Plan tab’s ⋯ menu, or ask Penny to “build me a starter budget from my transactions” — she’ll draft groups, envelopes and monthly amounts from what you actually spend, and you review it before anything is applied.
6. Spend
That’s it. Buy groceries, and the transaction files into Groceries and draws the envelope down. How it gets there depends on you:
- Bank connected: the transaction syncs in and files itself — Afford learns your payees (see Activity).
- By hand: tap + at the top of Plan, Spend or Activity. Start typing the payee and Afford fills in the envelope, account and amount you used last time. Recurring bills can record their own payment on the due date — turn on Record on its own when due in the bill’s settings.
Next time you’re wondering about takeout, open the Spend tab — Available to Spend — and the answer is right there.
Where things live
| Tab | What it’s for |
|---|---|
| Plan | Home base: Available to Allocate, your monthly plan, every envelope |
| Spend | Available to Spend — the instant “can I afford it?” answer per envelope |
| Activity | Every transaction, search, filters and the review queue |
| Accounts | Balances, credit card cycles, bank connection |
| Reports | Spending by envelope, income vs. spending, savings goals |
| Penny | The assistant — a tab on iPad and Mac; on iPhone, tap ✨ at the top of any tab |
The month picker at the top of Plan, Spend, Activity and Reports is shared: change the month in one and the others follow. Settings is the gear button at the top of every tab (on the Mac, also Afford → Settings…).