UPDATE: This has been updated for the 3.0 release. The process for creating a new project has changed slightly since the Beta releases.
In this tutorial I will show you how to setup a new cocos2d-x multi-platform project for the recently released 3.0 Beta. Cocos2d-x is the C++ port of the popular cocos2d-iphone 2D game framework. Many popular games were made using the iPhone version of the framework, but it was written in Objective-C and geared towards Apple’s mobile OS platform. With Android starting to claim a major share of the mobile market, it is important to create something that can run on multiple platforms easily. Since cocos2d-x is written in cross-platform C++ it can be easily compiled for Mac, iOS, Android, Windows, and even Linux. The first two versions of cocos2d-x tried to follow the design of the iPhone version closely. This made the C++ code follow Objective-C patterns, which didn’t always fit very well. The new version 3 is going to redesign the code to use C++ best practices as well as some of the newer C++11 standards. This is a welcome change for the framework and should make it more maintainable and easier to use.
With this latest update you can now create your game projects in any directory you choose. Previously the projects were created within the cocos2d-x folder downloaded from the site, which made it difficult to upgrade your cocos2d-x version. The new version does make a copy of the entire framework to place in each project you create, so this could use up disk space quickly. The most ideal solution would be to have projects link back to the original source code without having to copy it, but this could get complex and have its own issues. We’ll just work with what is available at the movement and setup a new multi-platform project. Go ahead and download the cocos2d-x 3.0 Beta. Open up your terminal and run the provided script from cocos2d-x.
UPDATE: Cocos2d-x now uses the cocos console system to create projects and even run them too. Use the following commands for cocos2d-x RC0 and above.
$ cd cocos2d-x
$ ./setup.py
$ source /Users/Bryan/.bash_profile
$ cocos new BetaGame -p com.BradiaLabs.BetaGame -l cpp -d /Users/Bryan/Development/BradiaLabs
the setup.py will help you set the necessary environment variables to develop and build using cocos2d-x. The source command saves them to your user’s bash profile. You will only need to run the setup.py the first time you use cocos2d-x 3.0. For future projects you will only need to run the cocos command. The cocos new command will create a new project folder with the name BetaGame at the path /Users/Bryan/Development/BradiaLabs.
Here is how it was done during the Beta versions of cocos2d-x.
$ cd cocos2d-x/tools/project-creator
$ ./create_project.py -n BetaGame -k com.BradiaLabs.BetaGame -l cpp -p /Users/Bryan/Development/BradiaLabs
If you are a visual person you can run the script without any arguments and get the dialog box below. UPDATE: There is no longer a dialog box for the cocos console version of setting up a new project.
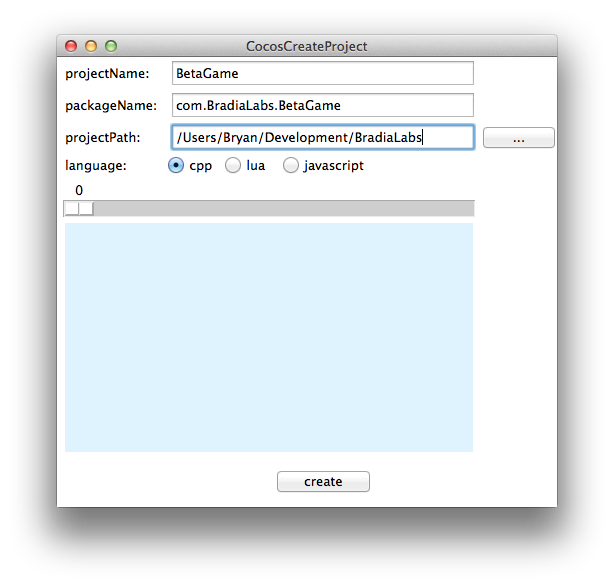
Just fill in the information for the game you want to create and this script will create the iOS/Mac, Android, Linux, and Windows projects. We will focus on the iOS and Android projects for this tutorial.
Find your project folder and open the Xcode project in the proj.ios_mac folder.
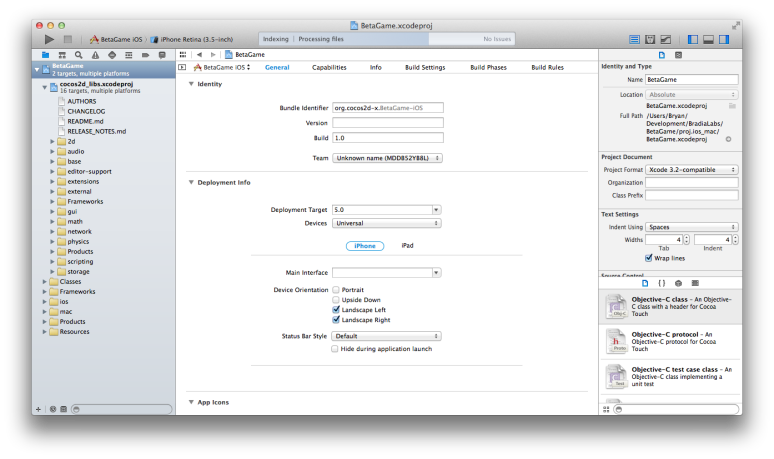
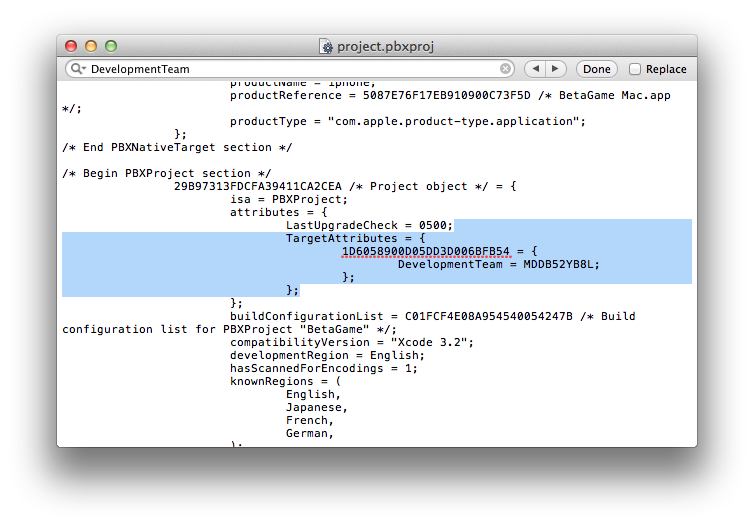
This screen shot shows the new project for our BetaGame. You can try to build the new project, but you may run into errors if you don’t have an Apple Developer Account yet. The project template ships with a team already selected within the identity section as seen above. This will be problematic because you can’t select none and you won’t be able to build the project unless you already have your own team to choose instead. We need to get rid of the cocos2d-x team from the project file. This can be done on a per project basis, or you could edit the template file that is used by cocos2d-x to create new projects. The template file can be found in cocos2d-x/template/multi-platform-cpp/proj.ios_mac/HelloCpp.xcodeproj. I will use our recently created project as an example though. Make sure you close out the project in Xcode. An xcodeproj file is actually a special folder, so we need to see what is inside of it. Hold down control and click the project file. Select the Show Package Contents option. This will show some more files inside of the project. Hold down control and click the project.pbxproj file, then select the Open With option and pick TextEdit to edit the file. Click on Edit then Find in the TextEdit menu. Find the string “DevelopmentTeam”. Remove all of the text selected in the screen shot below.
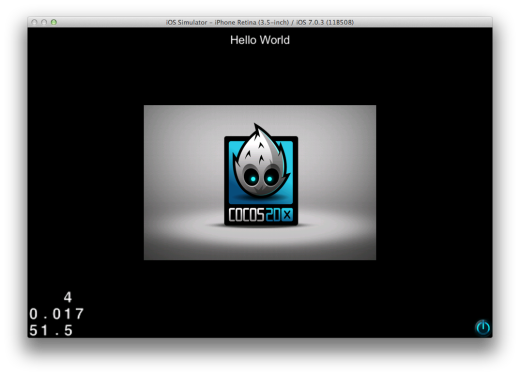
Now you can open the project in Xcode again and the Team should say “None” now. Go ahead and build and run the project. It should start up the simulator and you’ll see the image below. UPDATE: cocos adds a new command for building and running your project.
$ cd /path/to/your/BetaGame
$ cocos run -p iOS
Next we will build the project for Android. If you haven’t already downloaded it, go ahead and grab the Android SDK and NDK. I grabbed the ADT package that includes eclipse and the SDK. Next you will need to open up a command prompt and add some environment variables. Edit your bash profile. UPDATE: These environment variables should have all been entered when you ran the setup.py script. If you hadn’t downloaded android yet when you ran it, just re-run setup.py instead of adding the variables manually, but here is how to do it manually just in case.
$ pico ~/.bash_profile
Then add the following to the file
export ANDROID_SDK_ROOT="path/to/android/sdk"
export NDK_ROOT="path/to/android-ndk"
export PATH="$ANDROID_SDK_ROOT/platform_tools:$ANDROID_SDK_ROOT/tools:$PATH"
Now restart your terminal. Make sure everything is setup correctly. Run the following command.
$ android list target
Available Android targets:
----------
id: 1 or "android-17"
     Name: Android 4.2.2
     Type: Platform
     API level: 17
     Revision: 2
     Skins: HVGA, QVGA, WQVGA400, WQVGA432, WSVGA, WVGA800 (default), WVGA854, WXGA720, WXGA800, WXGA800-7in
     ABIs : armeabi-v7a, x86
----------
id: 2 or "android-18"
     Name: Android 4.3
     Type: Platform
     API level: 18
     Revision: 2
     Skins: HVGA, QVGA, WQVGA400, WQVGA432, WSVGA, WVGA800 (default), WVGA854, WXGA720, WXGA800, WXGA800-7in
     ABIs : armeabi-v7a, x86
----------
id: 3 or "android-19"
     Name: Android 4.4
     Type: Platform
     API level: 19
     Revision: 1
     Skins: HVGA, QVGA, WQVGA400, WQVGA432, WSVGA, WVGA800 (default), WVGA854, WXGA720, WXGA800, WXGA800-7in
     ABIs : armeabi-v7a
The output will show you the available SDK targets to use. We need to make sure the android project for our game is using one of the targets we have available.
$ cd path/to/your/BetaGame/proj.android
$ android update project -p . -t android-19
$ android update project -p ../cocos2d/cocos/2d/platform/android/java/ -t android-19
The first android update project command will update the android project for you current game. The second one will update the reference java project that your game project references for the cocos2d targets. Now we can build the android project. UPDATE: With the cocos console you can build and run with just this one command.
$ cd /path/to/your/BetaGame
$ cocos run -p android -j 4
Here is the manual way of doing it though.
$ ./build_native.py
Now that the project has been built we can run it on a device. Either plug in your Android phone or start up an Android Virtual Device. To start up a virtual device open the device manager and select one to start.
$ android avd
Make sure you have Apache Ant installed and install the game to the device.
$ ant debug install
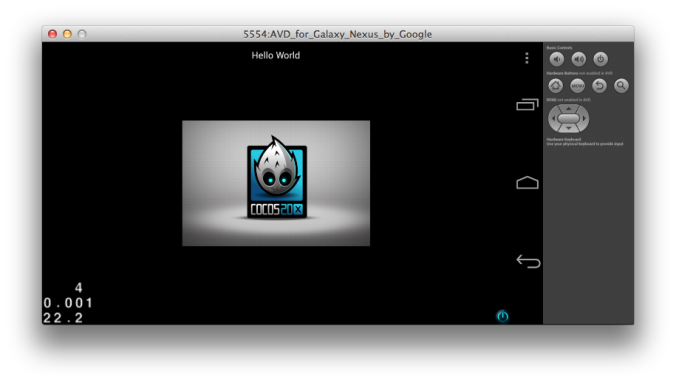
You should now see the game running!
Now you have a game that will run on both iOS and Android! You can also build it for windows by opening the .sln file in Visual Studio 2012 and Building and Running the solution. I don’t have Windows installed on any computers right now, so I can’t help much on the Windows front. In future posts we’ll start turning this new project into a game!